Everything You Need To Know In Google Classroom (Part 2)
6 minute read

This is part 2 of a three part guide. View part one and part three.
Google Classroom is one of Google’s newest, most useful, and least understood products. My inbox is constantly filled with questions on how to best use all of the features Classroom offers and often times I don’t know the answers. That was until a very knowledgeable reader graced me with this massive guide on everything one needs to know to get started on Google Classroom.
Last week I posted part one of this guide, covering logging in to inviting your students. Now I present part two, which goes even deeper into Google Classroom and details such tasks as setting comment rules all the way to posting and grading assignments. There is still one more part to come of this in depth guide, but don’t wait to dig into this second installment and explore all that Classroom has to offer.
6. Setting Student Comment Rules
If you just invited students to your class you should still be in this student screen. In that screen there is a button in the middle of the page that will initially say: Students can post and comment.

When you click on that it will give you three options.

1. Students can post and comment – No restrictions, basically Google Classroom’s version of Facebook.
2. Students can only comment – Students can only comment on your post.
3. Only teacher can post or comment – No student comments at all.
7. Student Commenting – Teacher Knows All
I always make sure the students know that you as the teacher see all in Google Classroom. You can see any posts they make – EVEN IF THEY DELETE THEM –
8. Options on a Student Comment
On a student post click on the action button at the right side of the post (3 dots). This will give you three options.

1. Move to top – This will move the post to the top of the stream page in Google Classroom.
2. Delete – Erases comment completely
3. Mute – Removes the student’s ability to comment at all in the stream or on your posts. (This does not remove their capability to do assignments or answer questions.)
9. Stream Tab
The stream tab is where everything happens once you get your classroom up and running. Think of it like Facebook. Anytime you post anything it will go to the top of the page. Announcements, Questions and Assignments are all posted from here. The fourth option is to reuse a previous post. Below you will see what the stream page looks like when you first set it up. You have to click on the + button in the lower right hand corner of the screen to display the options.
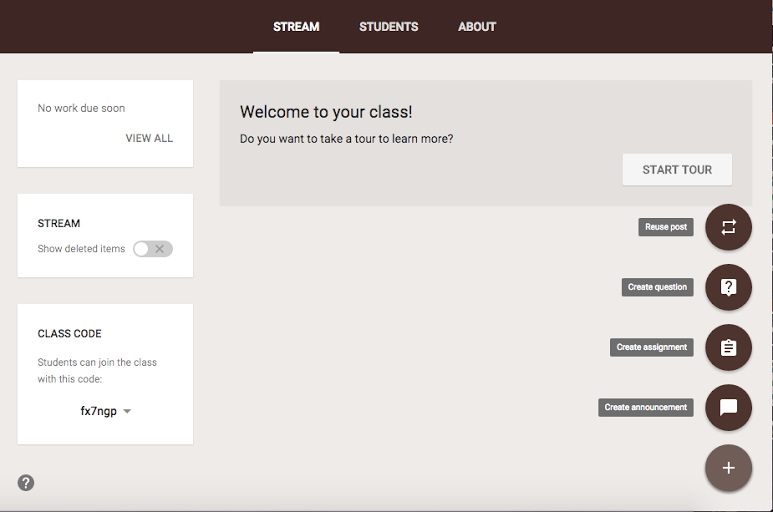
The stream is where all comments show up from students as well. Take notice of the three boxes on the side.

The above screenshot is from an active class. It is the work due soon box in the upper left hand. It gives all users a quick glance view of what due dates are coming up.

Earlier I mentioned the teacher could see all comments, even the deleted ones. The middle box is where you do that.

The last box is another place you can show students the class code to join the class.
10. Creating an Assignment
This is where the everyday use really gets going. When you click on the “create an assignment” button the following screen appears.
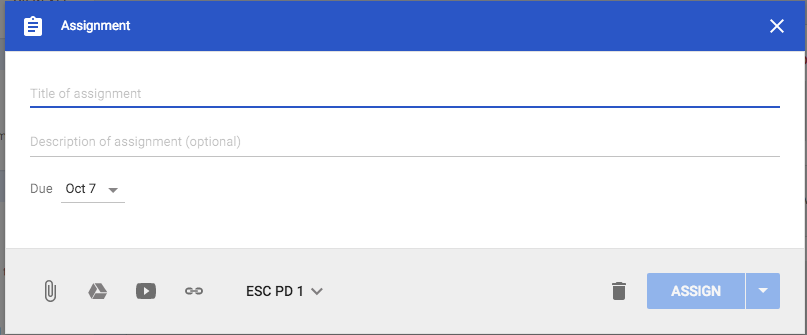
You then fill in the details.
-Top line is the Title of the assignment.
-Second row is the description* (Optional)
*I usually use this to include the directions for the assignment.
Click on the due date to select when you want it due.

You can even be as specific as setting a time.
Select the files you want to attach. If you look at the bottom you have several options for file types.

If you use the 2nd button, which is Google Drive, you have even more options.
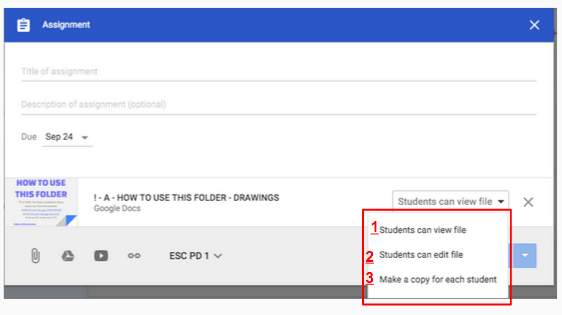
1. Students can view file
1a. Use for a document you want the students to see, but not edit.
2. Students can edit file
2a. All the students would edit the SAME document. This is great for class discussions.
3. Make a copy for each student.
3a. This puts a copy of the attached document in their Google Drive and allows them to edit it and then turn it in. This makes the process totally paperless.
Next to the attachment section you will see the class name with a down arrow. If you click on that it will show you all the classes you have created. Then click on each class you want the assignment in, which makes it so you don’t have to rewrite the assignment for each class.

11. Adding Forms in Google Classroom (New as of 10/8/2015)
Until recently, it was hard to link to Forms into Classroom. Google for EDU has just released an update to solve this. When you attach a Form (usually an online quiz or survey) the student receives a link that takes them straight to the Form. They click submit to finish the Form/quiz and it automatically marks them as done in Google Classroom.
Click HERE for animation on the process.
12. See the Student’s Work During the Whole Process
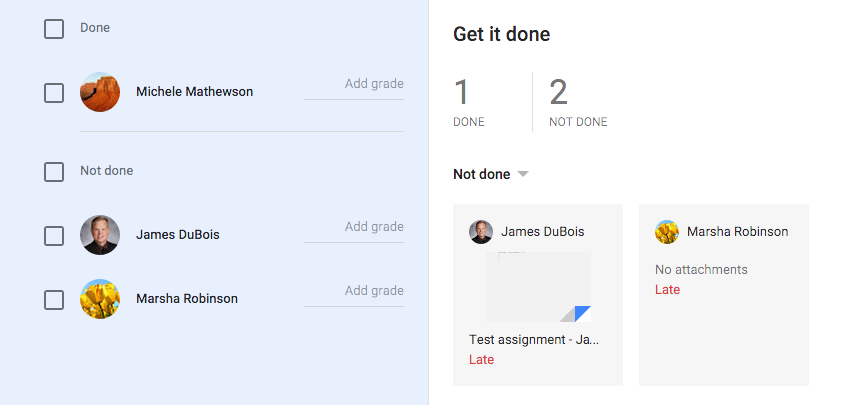
One of the greatest things about Google Classroom is you can monitor the student’s work during the whole process. After you assign it, the student clicks on the link to open it. This creates the document in their Drive, if you selected that option, and then shares it with you within classroom. You can then do a quick check to see who has done what.
 13. Assigning a Grade
As you can see above in the view of the student’s work, you can also assign a grade. After you view their work, go to the other side of the screen and add their grade.
You can change the point value for the assignment up top. It has preset values and you can enter you own value as well.

When you are ready to return the assignment click on the student you want to return and click the return button above. This will trigger an email with their grade being sent to them and a copy of their assignment.


 13. Assigning a Grade
