A Step-by-Step Guide to Provisioning Users in Office 365
November 2, 2015
5 minute read

Provisioning and deprovisioning users in Office 365 are commonplace activities for IT professionals. Unfortunately, they’re also time-consuming and error-prone.
The process necessitates accuracy. Nothing is worse than a new employee getting a fresh account with their name spelled wrong. When numerous cloud applications link to your user’s Azure AD identity, misspelled names or other incorrect details can mean disconnected or broken accounts, single sign-on problems, and other confusion. I’ve seen a single misspelled last name take two hours to fix across 10 different cloud services.
There are two methods for provisioning users in Office 365 (depending on if your environment is federated or cloud-only). The initial steps are the same in both cases, but there are some differences along the way.
Initial Steps for Both Federated Tenants and Cloud-Only
1) Check To See If You Have Available Licenses
According to Microsoft, to see if you have available licenses, you need to log in to the admin center as a global admin, then take the following steps.
- Select the app launcher icon in the upper-left and choose Admin.
- Go to the Licenses page;
- In the Office 365 admin center, choose Billing > Licenses, or; (If your organization purchased Office 365 small and midsized business subscriptions through a partner) Under billing, choose View and edit subscriptions
- Check the Valid, Expired, and Assigned columns for your subscription. To figure out how many valid licenses are still available to assign to users, subtract the number of Assigned licenses from the number of Valid licenses.
2) Gather the User’s Information and Double Check it Before Beginning
At BetterCloud, I get the information for onboarding employees directly from HR. Our HR Director creates an all-day calendar invite on the new employee’s first day. The invite will include all relevant information that I need to provision him or her, such as:
- First Name
- Last Name
- Department
- Title
After I receive the invitation from HR, I reach out directly to the new user’s manager to ask about group membership, administrative permissions, special software required, and whether or not they need other Office 365 products like Yammer or Delve. From there, I track every new hire with an IT Support Ticket containing all important details.
This is where the steps differ.
Federated Tenants Follow The Steps Below:
Cloud-only Tenants Follow The Steps Below:
Provisioning Office 365 Users in a Federated Tenant
3) Create an Account in Local AD using Standard Attributes
It’s critical that you input the following information correctly. When possible copy the information below as opposed to typing it in yourself. In smaller organizations, this is usually done directly on a Domain Controller in AD Users and Computers; however, larger organizations often have third-party tools to help automate their Local AD provisioning.
This step is important because, with a federated domain, the new user must exist in local AD and be synced up to Azure AD before any Office 365 services are available.
- First Name
- Last Name
- User Name
- UPN
- Email Address
- Password
4) Force an Azure AD Sync or Wait for the Regular Sync Interval
Most organizations sync on an hourly basis, but that can vary greatly depending on company size and other factors. If you don’t want to wait, or don’t have time to, you can force an Azure AD Sync.
To force an Azure AD Sync, login to the Windows Server hosting Azure AD Connect and navigate to C:Program FilesMicrosoft Azure AD SyncBin. From there, you’ll want to run the following:
- For a Delta Sync: DirectorySyncClientCmd.exe delta
- For a Full Sync: DirectorySyncClientCmd.exe initial
5) Log in to Office 365 as a Global Admin and Add an Office 365 License to the New User
In the Office 365 Admin Center, choose Users > Active Users. Then, in the “Select a View” list, choose Unlicensed users. You can then add an Office 365 license to the new user by using selecting “add to existing license assignments.”
I’ve also seen this automated with Powershell, because what can’t you do with Powershell?
6) Send Welcome Email and Share Credentials
Organizations must manually send welcome emails if you are using Local AD.
A good welcome email will include:
- First name
- Last name
- Username
- Temporary password and instructions on how to change it
- Your organization’s password policy
- A link to the Office Portal
- Instructions on how to download Office
- Any necessary mobile apps users need to download etc.
The welcome email is also a good opportunity to include a link to internal training resources (or an external source like the BetterCloud Monitor).
Note: Depending on your organization’s approach to security, you can email new users a temporary password. However, many large enterprises give their new users a slip of paper on their first day with their temporary password.
The following steps are for cloud-only tenants.
Provisioning Office 365 Users in a Cloud-Only Tenant
7) Log in to Office 365 Admin Center as a Global Admin and Add User
Choose Users > Active Users, then select “+” to add user.
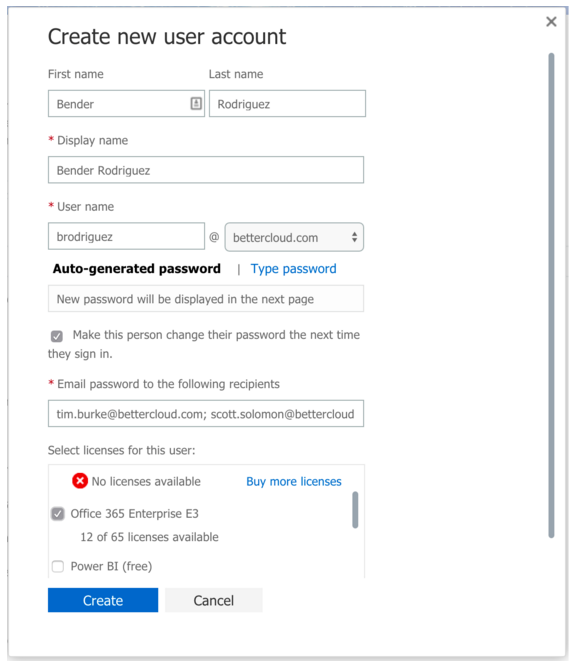
8) Input New User Information
Enter a display name, username, and then choose the tenant for your user (if there is more than one).
9) Accept or Generate Your New User’s Password and Office 365 License
Accept the temporary password or use one you create yourself. I highly recommend selecting the checkbox that reads: “Make this person change their password the next time they sign in.”
Assign a license by navigating to the “Select license for this user” section, and then check the box next to the license type you would like to apply to the new user.
10) Send Welcome Email, Share Credentials, and Force Password Change
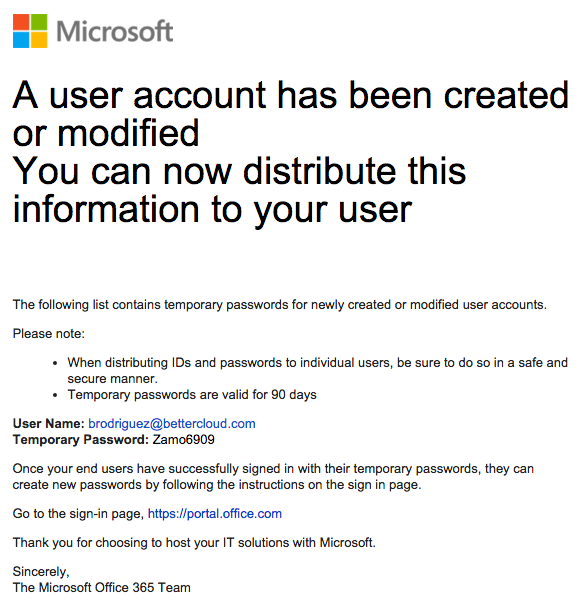
In a cloud-only environment, the welcome email is automated.
This includes very basic account information. I recommend following up with a second email that is more specific to your organization.
A good welcome email will include:
- First name
- Last name
- Username
- Temporary password and instructions on how to change it
- Your organization’s password policy
- A link to the Office Portal
- Instructions on how to download Office
- Any necessary mobile apps users need to download etc.
The cloud is still a new environment for many, so this welcome email is a great opportunity to include resources about cloud office best practices, specifically Office 365. The cloud offers significant advantages, but your users must know how to leverage its benefits to truly thrive.
Note: You can email new users a temporary password depending on your security. Many big enterprises that take a great deal of care when it comes to security will give their new users a slip of paper with their temporary password on their first day.
To learn how to deprovision users in Office 365, click here.


