


Product Tip Tuesday: Schedule employee offboarding through BetterCloud & G Suite
July 30, 2019
7 minute read

A recent post in our BetterIT community got us thinking here at BetterCloud: How could we get our users scheduled offboarding without the use of Okta or Zapier, sticking only with Google and BetterCloud?
In today’s Product Tip Tuesday, we’re providing instructions on how you can set up offboarding via a Google Sheet, an Apps Script, and BetterCloud. This allows IT admins to set an employee’s last day as their offboard day, specifying down to the hour when offboarding should occur. It ensures not only that the user is locked out of the organization, but also that all files, groups, sites, and calendar events are transferred in a timely manner.
Please note: This Apps Script is designed to only move users into their offboarding OU. This should not be used to schedule any other automated processes. We do not recommend modifying this Apps Script in any way, and any changes/modifications will not be supported.
Prerequisites
It is best to be a Super Admin in your G Suite environment with the ability to permit an Apps Script to edit your user directory. While no programming knowledge is required to implement this solution, any customizations should be done by someone who has familiarity with Apps Scripts or object-oriented programming languages.
Background information
G Suite knows who your users are. BetterCloud knows who your users are in G Suite. While adding a user to an offboarding OU can kick off a workflow in BetterCloud, scheduling offboarding may be useful as well. Fortunately, by using a Sheet and an Apps Script, you are able to set the date you’d like your user(s) to move into your offboarding OU, then have the action take place automatically.
Step 1: Set up the Sheet
Title the Sheet as you’d like. Column headings should appear as follows. Those in RED are required fields. Please do not alter the format of any fields unless specified below.
A. Date of Entry
B. User’s Email
C. Confirm User’s Email
D. Manager’s Email (not required, but will update manager’s email immediately if filled in)
E. Location
F. Date/Time for Offboarding (ensure this is date/time format)
G. Days Until Offboarding
H. User Offboarded?
I. Event Log
At the bottom of the sheet, change the Sheet1 text to read Offboarding.

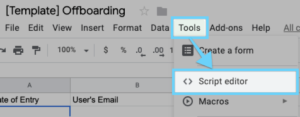
Step 2: Create an Apps Script
In the Sheet menu, click on Tools, and then Script editor. This is where you will create an Apps Script that links the Sheet to your admin directory. Don’t worry, the code will be provided with plenty of comments, linked in the paragraph below this image!
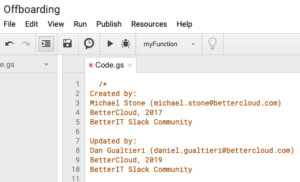
With the script editor open, name the Apps Script Offboarding (top left). Now clear all text in the Apps Scripts body so you’re left with a blank page. Paste in the code found here so /* appears on line 1. It will look like this:
Once you’ve pasted the code onto the page, you’ll be modifying three lines: 17, 19, and 20.
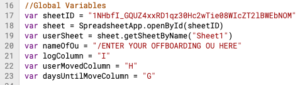
For line 17, navigate back to your Sheet. In your browser’s address bar, find the alphanumeric ID for your Sheet. It will look similar to the below:

Replace ENTER YOUR SHEET ID HERE with the alphanumeric string so it appears like this:

Notice the 1NHbfl… that appears in the address bar is now placed into line 17 after var sheetID = within quotes. For line 19, update Sheet1 to be Offboarding as seen below:

For line 20, navigate to your G Suite instance and copy the name of your offboarding Organizational Unit and paste it over the text ENTER YOUR OFFBOARDING OU HERE. Ensure the forward slash stays in front of the OU. This will ensure the Apps Script finds the OU in your directory.

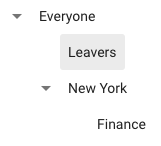
Important note for those with sub-OUs: If your organizational unit is nested within another OU, please ensure you enter the entire path. In the image below, /Leavers is the correct path. However, if your offboarding OU is “Finance,” the path you would enter into line 20 would be /New York/Finance.
Congratulations! Your Apps Script is written.
It’s just point-and-click from here on out.
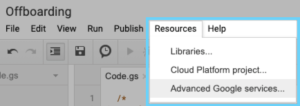
Step 3: Allow access to your Admin Directory API
This step is why you are required to be a Super Admin within your org; you will be granting the Apps Script access to your directory. On the Apps Script menu, click on Resources, then select Advanced Google services:
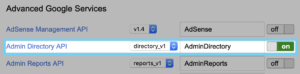
Within the window that pops up, turn ON Admin Directory API by clicking the toggle to its right. After it is toggled on, click OK (bottom left).
Step 4: Fill the Sheet and test the script
Spreadsheet: Head back to the spreadsheet and enter a test user you’d like to offboard. Remember, columns B, C, and F are the only things required. For this initial test, set the date of offboarding to be today’s date, and a time close to (or prior to) when you will be running the script. Once this information is filled in, switch back to your Apps Script.
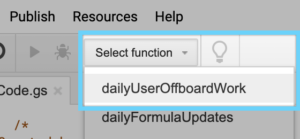
Apps Script: On the Apps Script page, click the Select function drop-down, then click on dailyUserOffboardWork.
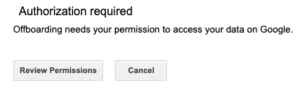
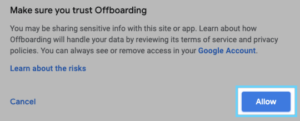
Once this is selected, click the Run button (it looks like a play button, found to the left of the bug icon). You will be prompted to authorize the Apps Script. Click on Review Permissions.
In the new window, select the account you’re using to run this script, then on the next screen, scroll down and click the blue Allow button.
Spreadsheet: Switch back to your sheet. Once the date/time for the user’s offboarding has passed, you will see that Days Until Offboarding is listed as 0 (or less than 0). User Offboarded is listed as YES and the Event Log column states the user was moved to your offboarding OU. If the user is not properly moved to the offboarding OU, the reason why will be written to the log column to help you understand what went wrong.
What if this fails and the user isn’t moved into the offboarding OU?
Check to ensure lines 17, 19, and 20 are correctly entered, that the Admin Directory API has been turned on, and that the Sheet is properly filled in (the user’s email has been entered in columns B and C, and the offboard date is listed in column F).
Step 5: Automating the action
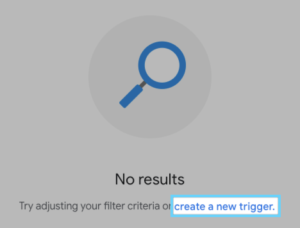
Once you’ve gotten the script to run and the test user ends up in the right offboarding OU, you can now set the script to trigger on its own. Navigate to https://script.google.com/home/my and locate the Offboarding project. Place your cursor over the Offboarding project in the table so you can see three dots at the far right of the table. Click on those three dots, then select Triggers.
A new page will load, where you will be able to select create a new trigger.
Select the following:
- Choose which function to run > dailyOffboardUserWorkflow
- Choose which deployment should run > Head
- Select event source > Time-driven
- Select type of time based trigger > This is up to you. If you would like this to run daily, select Day timer.
- Select time of day > This is up to you. Select the time when you would like the user to be moved to an OU to kick off your offboarding.
- Failure notification settings > If you would like to be notified of failure, select your notification intervals.
Additional security: Further protect the Sheet
You should lock down the sheet you are working on beyond typical sharing. Within the Offboarding sheet, click on Tools in the menu, then select Protect sheet… from the drop-down. Provide a description for the protection, then click Set permissions. If you want to be the lone editor for this, leave Only you selected in the drop-down. If you’d like others to be able to edit this, click the drop-down and add users or groups (preferably groups) to this file. On the next screen, select Edit from the drop-down.
Once this is set, click on the green Share button, select Advanced (bottom right of the pop-up) and click the checkbox next to Prevent editors from changing access and adding new people. This will ensure only the people you want to edit this Sheet are able to.
Closing
You are now set up to run offboarding on any users added to your Sheet. If you would like this to be customized, please contact your customer success manager here at BetterCloud and they will be able to work with you to understand your needs. Please keep in mind this is a custom solution, so requested changes may not be possible, but they will certainly be looked into and tested.
Thanks for reading, and stay tuned for the next Product Tip Tuesday!


