Office 365 Email Signatures
Email signatures can be a powerful tool, since they contain information that goes out with every new email sent. If you use a pre-made signature in your work or personal emails, you likely include your contact information, a job title and/or company name, and perhaps an image or logo. All of these elements convey a lot about the sender and the company, so they should be useful, informational, and visually attractive. In Office 365, individual users can create and add signatures that can be added automatically to all outgoing emails or applied only to specific messages.
Signatures created in the Outlook Web App will not be able to be used in Outlook 2013 and vice versa; if you use both platforms, you must create a signature in each. Outlook 2013 allows you to create one default signature and multiple alternative signatures, while the Outlook Web App only provides the option to create and use one signature.
Note that the Outlook Web App does not provide you the option to include an image file with your signature. However, if you copy an image file from another source and paste it into your signature, it will appear.
How To Create Office 365 Email Signatures
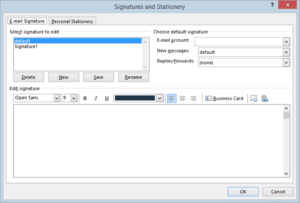
To create an email signature in Outlook 2013:
- From the File tab, click Options.
- In the Mail section, click the Signatures… button.
- In the Edit signature field, create your signature. You can modify the formatting and click the icons to add images and links.
- The first signature you create will be called “default.” To rename, click the Rename button and type a new name for the signature.
- In the Choose default signature section, select the email account to associate with the signature, if applicable.
- Using the drop-down menus, select the signature you want to appear appended to new messages and/or replies and forwards. You can also leave this option as (none).
- Click OK.

If you’ve chosen not to automatically add signatures to your Outlook 2013 emails, you can insert a signature manually by selecting the Insert tab in an email window, selecting Signature, and choosing the signature you’d like to insert.
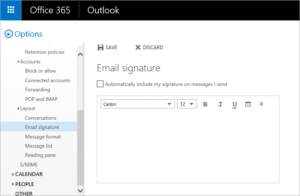
To create a signature in the Outlook Web App:
- Click the settings gear menu in the upper right corner.
- Select Options.
- Under Mail > Layout, select Email signature.
- In the text box, create your signature. You can modify the formatting with the mini toolbar.
- Check the Automatically include my signature on messages I send box to append your signature to all outgoing emails including replies and forwards.
- Click Save.

If you’ve chosen not to automatically add signatures to your Outlook Web App emails, you can manually add it by clicking the Insert button at the top of an email and selecting Your signature.
Office 365 Email Signatures For An Entire Organization
Office 365 does not provide native signature management functionality, but administrators can configure organization-wide signatures for their users with a disclaimer rule.
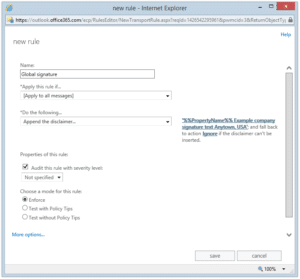
To create a disclaimer that can act as an automatic email signature for users, the administrator can follow these steps:
- Access the Exchange admin center.
- Select rules under mail flow.
- Click the plus icon (+) and select Apply disclaimers.
- Enter a name, i.e. “global signature.”
- From the Apply this rule if… drop-down menu, choose the conditions that will trigger the rule.
- From the Do the following… drop-down menu, select Append the disclaimer… (it should already be chosen).
- Click the Enter text link.
- In the resulting specify disclaimer text window, enter the text or HTML code of your organization-wide signature. Use user attribute properties such as %%FirstName%% for personalization. Click ok.
- Click the Select one… link to enter a fallback action in case the signature can’t be inserted, i.e. ignore (send the message without a signature).
- Adjust or keep the remaining settings and click save.

There are numerous limitations with this method of creating organization-wide signatures using Office 365:
- The disclaimer rule won’t override the users’ existing email signatures. If a user has entered their own signature, it will appear along with the signature created by the admin.
- There is no way to see the signature in Outlook, since it is appended by the server during transport. The signature is only visible after an email is sent.
- If you don’t set an exception to the rule, the email signature will be appended to every message, including replies and forwards.
- You can’t omit variable properties for subsets of users, i.e. if several users do not want their cell phone numbers included.
Alternatively, administrators can manage users’ signatures with a third-party signature management tool.

